The Arduino IDE is a good choice for a beginner to get into the world of small embedded devices. Feedback that I got from Weather Station Users indicates that the ESP8266 attracts many hobbyists to the IoT field that before had little experience with programming small devices. For me as a (professional) Java programmer the Arduino IDE lacks many features that I would expect from a modern development tool. The two that I miss most are
Auto-Complete (together with inline error indication) and proper
Dependency Management for used libraries. Today I discovered an alternative to the Arduino IDE which appears to offer these features and some other features that help to achieve faster development. It is called PlatformIO. This name recently popped up more and more on my Twitter stream and I decided to have a closer look if it was any good. And I have to say that I really like it!
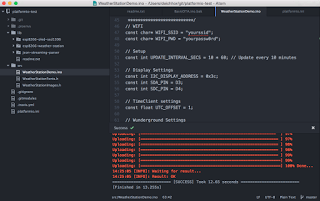 |
| Atom Editor with PlatformIO integration showing OTA update |
UPDATE: Ivan from Platformio just informed me, that there is now a ready to use package available that contains all the components described here https://atom.io/packages/platformio-ide
What is PlatformIO?
From what I saw today I would say it is a cross target platform, cross source operating system and cross build tool environment based on python. That’s a lot of crosses in one sentence so please bear with me. Let me describe what it can do for you: with just a few simple commands you can set up a build tool chain for a target platform, initialize a new project or upload a binary over-the-air (OTA) to your embedded device. Among other devices it supports the ESP8266 very well and can even use Arduino sketches (e.g. *.ino files) and compiles them without changes. I had OTA update running within just a few minutes and you can even configure it to auto-upload it after every build. What almost shocked me was that the OTA update actually was a lot faster than the common serial flash, which I had to do initially to get the OTAed code on the NodeMCU device.
Libraries can finally be part of your project as a git sub-module, which means that the hassle of keeping libraries in sync is reduced a lot. I haven’t tried this yet but I think you can actually define dependencies to 3rd party libraries without making them part of your project. I have registered my own libraries today but by now they do not show up yet in the library search tool of platform IO. This works actually similar to dependency management in gradle or maven in the Java world or npm, bower etc. in the JavaScript world.
Platform IO has a lot of integrations into other tools and platforms. There is support for Continuous Integration tools like Travis as well as support for various editors such as Github’s Atom editor. The community around platform IO seems to be very active and is adding new features and integrations quickly and frequently.
Getting Started
When I write tutorials I usually got a bit of experience with the topic. Which after a day of using Platform IO obviously is not the case. But I still like to give you a few pointers to get started as quickly as possible. But so far I can honestly say that the documentation is excellent.
Requirement for Platform IO is a descent version Python. Since I’m working on a Mac this precondition is already met.
pip install -U platformio
on the command line will install Platform IO to your machine. To initialize a project folder for a certain target platform (or even multiple platforms you can issue the command
platformio init --board=nodemcu --board=uno
which will initialize the current folder for a NodeMCU board and an Arduino Uno board. With
platformio run --target upload
you can upload the binary to your connected target device. Platform IO will try to figure out the serial port alone and this worked perfectly well for me. If you want to test OTA updates make sure that your sketch contains the necessary OTA code. The first time you’ll have to use the classic (serial) update mechanism, but then it gets interesting. Once you figured out the IP of your device you can simply add
upload_port = 192.168.2.127
to the platformio.ini file in the root of your project (replace it with your IP) and the next
platformio run --target upload
will update the ESP over the air! If you want to get started quickly you can checkout my test project from Github: https://github.com/squix78/platformio-test
The test project is the WeatherStation project “ported” to PlatformIO and includes all dependencies as Git Sub-Modules. Download the ZIP file or clone it with git, navigate your terminal to the project folder and connect your NodeMCU module. The to the above described “platformio run” command and you should be good to go. Ah, one important node: the WeatherStation code here contains the OTA code, so after the first installation on the device you can switch to OTA update…
Arduino IDE Alternatives
The title of this post promises an alternative to the Arduino IDE which I’m still owing you. I’m starting to like the Atom editor from Github more and more and there is a nice extension (package) which integrates PlatformIO into the Atom editor and this is called the Platomformio. After proper configuration (add your path variables to the settings of the extension) you are able to do build and uploads with simple shortcuts such as “cmd-shift-B” (build) or “cmd-shift-U” (upload). Then you can also enable Auto-Completion and possibly many more features which I haven’t tried out yet.
Links


Hi Dani,
Thanks a lot for great article!
We have awesome news for PlatformIO users. We have released today the first beta of PlatformIO IDE for Atom https://atom.io/packages/platformio-ide
Could you place the link to it on the top of article?
Thanks in advance!
Regards, Ivan Kravets, PlatformIO.