
I have been working on a new demo of the Weather Station which is built as a platformio project. It has a few features which are not in the library demo:
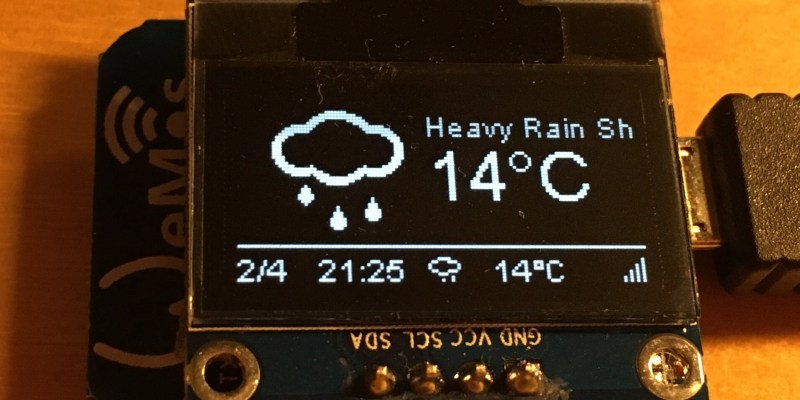
- Wifi Signal Quality icon in overlay
- Weather Icon, temperature and time in overlay
- By using Wifi Manager you can keep the wifi passwords out of your source code
How to get it running?
Download the Platformio IDE from here for your operating system and clone my github project. Now open the IDE and open the weather station project folder. No more need to install libraries manually, the platformio.ini file does this for you! You might still have to adapt:
- Your display pins (SDA & SCL)
- The Wunderground API key, location and language
- Your Thinkspeak credentials
Source Code

I am a little bit supprise: PlatformIO is not working with ESP8266, there is a bug in release 2.2.0, and it it impossible to use 2.3.0 Rc2 working with PlatformIO. This release works with Arduino IDE!!!
Hi Geo. Have your problems with Platformio been resolved in the meantime? I didn’t have any issues…
The trouble is due to some device sending broadcast, and release 2.2.0 reset, for me it is every minutes.
With staging release is ok (with Aduino IDE) but there something to modify for in PlatformIO to in order to use these staging release, I find somthing on forum but I am not able to understand what to modify. For the moment I continue to use Arduino IDE and Atom as Text editing…
I see also you “WiFiManager.h” from “Tzapu”, but for me this lib take the problem in reverse side, I prefer the release of “Kentaylor” ( /https://github.com/kentaylor/WiFiManager), which is the good one (for me).
Glad you like my version of WiFi Manager @Geo. Knowing others are interested will inspire me to update the Github repository
I’m impressed with the weather station and am adding some sensors and testing it at https://thingspeak.com/channels/126118 with some processed data at https://thingspeak.com/channels/126189 .
I’m also integrating the screen with WiFi Manager to try and improve the usability by providing WiFi feedback through the screen. Try the current version at https://github.com/kentaylor/esp8266-weather-station/tree/master/examples/WeatherDHT22ThreeScreensWiFiManager . I expect it to change a bit as I conduct more usability testing.
I make some change on your lib, in order to have French, I am changing trace also but not finished, no time…
Dear Geo,
PlatformIO CLI 2.11.0 has been just released! The Arduino for ESP8266 is updated to 2.3.0 too. More details:
– https://community.platformio.org/t/platformio-ide-1-3-0-and-platformio-cli-2-11-0/425
Regards,
Ivan @ PlatformIO
Something is wrong with libraries on PlatformIO. I get all interface working, connected to local wifi AP. There is no update on data from WU as also time. I get the following errors on serial monitor.
Setting readyForUpdate to true
connection failed
connection failed
connection failed
connection failed
I suppose it has to do with dns resolving. Any idea how can be fixed?
Anybody else having problem to get an wunderground api key? I was able to get one 3 days ago, but I did not saved the key, and unfortunatelly today I just get an error: “Error, Something went wrong with getting your new key.” Tried different browsers, new registration, VPN connection, nothing helped. Am I doing something wrong or is this a problem on wunderground side?
So today finally I was able to generate wunderground api key, but suddenly the wemos D1 mini module can’t connect to wifi. Nothing changed since 2 days ago, when it connected ok, got the time and the thingspeak data (but the weather from wunderground not, of course). I’m using the D4 hack to power the oled module, display works ok, but no wifi connection. It tries for about 30 sec then the module restarts itself and it goes this way over and over again.
I got this error:
Exception (29):
epc1=0x4000e1b2 epc2=0x00000000 epc3=0x00000000 excvaddr=0x00000000 depc=0x00000000
ctx: sys
sp: 3ffffcc0 end: 3fffffb0 offset: 01a0
>>>stack>>>
… stack here …
<<<stack<<<
ets Jan 8 2013,rst cause:2, boot mode:(3,6)
load 0x4010f000, len 1264, room 16
tail 0
chksum 0x0f
csum 0x0f
~ld
Any idea, what's wrong? I tried to postpone the display powerup and initialisation after wifi connect, but did not helped. Also tried from an external power source, same error.
Thanks!
“rst cause:2” implies reset has been pulled low. “boot mode:(3,6)” is a normal boot, see https://github.com/esp8266/Arduino/issues/1013 . Did you do something to pull reset low?
A fault that can cause you to lose the ability to connect to WiFi is corrupted flash memory. This sketch https://github.com/kentaylor/EraseEsp8266Flash will erase the flash if that is your problem. It is quick and easy to give it a try.
I’m using the piggyback screen as well. It is a cool idea but for me a side effect is changes in the way the Wemos behave. I wonder why I see no other comments on this. Because of the 30 second interval after boot I don’t think this is your problem but understanding the changes may help.
I find the the Arduino IDE can not put the Wemos into programming mode with the screen connected this way. A manual reset brings it up in a mode that enables the Arduino IDE to now reboot the ESP8266 into programming mode. This is because Pins D2 and D4 are input pins during the boot up that define how it boots. With the screen connected, D4 is held high and D2 held low so that the I see boot mode:(1,7) which means it boots into “Download code from UART” mode according to https://github.com/esp8266/esp8266-wiki/wiki/Boot-Process#esp-boot-modes . I’ve no idea what the 7 indicates. Because D2 and D4 are now configured as inputs it usually boots up in the normal mode if it is reset a second time. This behaviour can be a bit confusing.
Hi Daniel
Very cool and extreme well done. I tried it in my housing (see your post of 1st of July 15) so I had to flip the display
This doesn’t work by un-commenting the line 134 as the display is re-initialized in line 189. Therefore the flipScreenVertically statement needs to be repeated.
Further I’d like to propose an improvement: The time display is made in a matter that it can’t deal with daylight saving. As the wounderground API provides the actual time in the city were the weather is requested, this could be used as a time base. This would solve the daylight saving issue.
rg
Yes I see that, but this time
it is PlatformIO IDE Terminal which cannot be updated to 2.0.10
and PlatformIO-ide which cannot be updated to last release
I think it is not timr to use PlatformIO!!!
The latest version of PlatformIO IDE Terminal is 2.1.0. Do you have any problems with updating process?
Yes I have that:
Uncaught TypeError: Ccannot read prperty ‘substr’ of null
C:\Users\Patrick\AppData\Local\atom\app-1.8.0\resources\app.asar\node_modules\settings-view\lib\package-card.js:709
The error was thrown from the settings-view package. This issue has already been reported.
and link to here: https://github.com/atom/settings-view/issues/792
Wow this looks awesome but I’m having a hard time with Platformio, will this port to Arduino IDE? Thanks.
> Wow this looks awesome but I’m having a hard time with Platformio
Could you explain your problems with PlatformIO?
Thanks in advance!
– Ivan
Well to be completely honest it’s not the program,it’s simply my unfamiliarity. I’m not a programmer but a big fan of Arduino and also Daniel’s Weather Station I’m slowly learning coding and I’ve learned the Arduino IDE. I installed Platformio and poked around and it seems to be easier to use aesthetically but I simply don’t know what to do haha.
Please read our small Quick Start for PlatformIO IDE
– http://docs.platformio.org/en/latest/ide/atom.html#quick-start
Is this the updated version or the one called ESP weather station? I’m confused.
If you show me some links I can tell u which one is the latest and most up-to-date…
This: https://github.com/squix78/esp8266-weather-station-platformio-demo
Has the WifiManager in the program and the overlays.
This one doesn’t seem to have the updates?
https://github.com/squix78/esp8266-weather-station
The second one is the library project. It contains examples which run in the Arduino IDE or platformio. The first link points to a demo project which uses the library but adds a few more features like the WifiManager and more detailed overlays… So, in a way you might need both, depending on your editor…
Yes, I used parts of each. I just started using Platformio for this project so I’ve got a lot to learn. I like it better than the arduino IDE. Your work and feedback is greatly appreciated. Keep it up!
Got an error when i use OTA and “upload_port = ESP8266-OTA-15ebb.local”
File “C:\Users\rallm\.platformio\packages\framework-arduinoespressif\tools\espota.py”, line 95, in serve
sent = sock2.sendto(message.encode(), remote_address)
socket.gaierror: [Errno 11001] getaddrinfo failed
scons: *** [upload] Error 1
when i use IpAdress instead of Hostname it works, like this:
upload_port = 134.103.68.117
First of all let me thank you for this great piece of software Daniel!
I never worked with Platformio before so the error may be sitting in front of the keyboard… 🙂
So I installed Platformio, downloaded the project and opened it in Platformio. First all I did was change the upload_port in platformio.ini. Build and upload went through without any errors and the display worked. Then I changed the WU API key, clicked “Build” and got three errors: D2, D3 and D4 “was not declared in this scope”. I deleted the project several times and started from scratch but every time I change something in the main.cpp I get the same errors.
Any ideas what went wrong?
Hi Hermann. Don’t worry, you appear not to be the only one struggling with (my) platformio projects. First of all I have a few questions: which ESP8266 module are you using? And are you using the Atom editor based Platformio IDE or an integration into another IDE? The D2… issue indicates that you are not using an ESP8266 module which knows these pin mappings. If your platformio project was set to a NodeMCU or Wemos D1 Mini then the compiler would recognize the D-pin mappings. My first suggestion, based on what I know is that you select the following from the Menu: Platformio > Initialize new PlatformIO project or modify existing… Then you select your board and make sure that you are using the correct directory. In the end you open platformio.ini and make sure that you have only one section in square brackets. You might have to merge if you have two or more sections. Then try again to run it on your hardware… Please let me know how it worked out. I got several people complaining that they were struggling with Platformio and it would be great if I could adjust my instructions…
Hi Daniel,
You project looks very good. Please add to this article small instruction how to use it. No need to do additional Import/Initialization or etc.
1. Download https://github.com/squix78/esp8266-weather-station-platformio-demo/archive/master.zip and unzip
2. Open PlatformIO IDE
3. Menu: PlatformIO > Open Project Folder (or use `folder` icon on Tool bar)
4. Press Build/Upload button.
Please sorry for the inconveniences that users have an issue with PlatformIO because PlatformIO IDE != Arduino IDE 🙁 As a result, a lot of users think that PlatformIO is the replacement for Arduino IDE. This is an incorrect opinion.
We don’t have an aim to “repeat” Arduino IDE with new GUI/Design. PlatformIO is alternative ecosystem from the other planet with own workflow (`platformio.ini`), own cross-platform solutions and instruments.
Do you have any ideas how to avoid these issues? Yes, to make an article with Arduino IDE will resolve all issues because users understand how to use it. Nevertheless, PlatformIO looks more interesting from a developer’s point of view. Also, we have a lot of visitors to our site from your blog. This is important for us. Thanks a lot!
– Ivan
Hi Ivan. Thanks for your clarification. As a professional (Java) developer I just love the platformio ecosystem. It provides similar features as I am used from The Java tools: dependency management (I would love to define a version in platformio.ini per lib though), auto complete, syntax highlighting and a headless mode for continuous integration. Especially the automatic downloading of 3rd party libs facilitates setup for my readers a lot. I’m sure the readers of this blog appreciate this as well. I will add your four steps to the article and see if it resolves issues for first time users for good! Keep up the great work on platformio! Thank you!
Sorry, I forgot to mention that the “Menu: Initialize/Update existing Project” can be used between 3 and 4 step if user has other board than “d1_mini”. In this case, the new build environment will be created. To build/upload using “other” board need to use “Menu: PlatformIO > Run other target…” or “Build Menu” in the bottom/left corner. What is more, if user doesn’t need “d1_mini”, he can disable/comment it in “platformio.ini”.
The other option is “env_default” ( http://docs.platformio.org/en/latest/projectconf.html#env-default ), where user can specify the list with environment that will be processed automatically when Build/Upload/Clean buttons are pressed.
Hi Ivan,
please see the post right below this one.
Any ideas what went wrong there?
Hermann
Hi Daniel,
thanks for the quick answer.
I am using the Wemos D1 mini. Platformio is the “standalone” version downloaded from the link above. OS is Windows 7 Home.
According to the quick start on the Platformio page, I did the initialization you mentioned above. I selected “Wemos D1 R2 & mini” and the initialization was successful but when I go back into that menu, the “Selected board” is empty. Is that normal?
So after spending a few hours trying, this is the procedure that works at the moment:
1. Open Atom.
2. Initialize board.
3. Build and upload.
4. Change source code and save
5. Close Atom
6. Goto 1.
Not the ideal situation but maybe there is something I overlooked…
Hi Hermann,
> but when I go back into that menu, the “Selected board” is empty. Is that normal
We don’t show in this dialog used boards 🙁 Please create a new issue ( https://github.com/platformio/platformio-atom-ide/issues ) and I’ll fix it.
Nevertheless, PlatformIO allows having multiple environments for the same source code with the same board. For example, the one “env” is used for debug purpose, where another is used for “release”:
platformio.ini
“`
[env:myenv_debug]
board = board_a
build_flags = -D DEBUG -D SOME_MACROS
lib_install = custom debug libs
[env:myenv_release]
board = board_a
build_flags = -D RELEASE
[env:myenv2]
board = board_b
“`
Hi Ivan,
thanks for the clarification. I am very new to Platformio so I am still trying to understand the basics.
Do you have any idea why I always get the error “D2 was not declared in this scope” (or D3 or any other pin) as soon as I change something in main.cpp?
If I do the change, save, close Atom, reopen it again and build the project this error does not come up.
Hermann
> Do you have any idea why I always get the error “D2 was not declared in this scope” (or D3 or any other pin) as soon as I change something in main.cpp?
These are linter errors. Please ignore them. I’ll check it and reply here.
Herman,
Thanks a lot that reported this issue! It’s really a bug (for a few ESP8266-based boards) with Project Generator for PlatformIO IDE. Some data (“includes” for C Preprocessor) was incorrect and linter showed invalid error messages. I’ve just fixed it:
– https://github.com/platformio/platformio/commit/dfc594fc3927fc3d71d8b86ba477632a38a59191
PlatformIO CLI 2.11.2 is going to be released next week. However, you can switch to PlatformIO 2.11.2.dev1 without any risk. Please follow to `Menu: PlatformIO > Settings > PlatformIO IDE` and check “Use development version of PlatformIO”. Then, please restart IDE and force “Menu: PlatformIO > Rebuild C/C++ Project Index”.
Does it work now?
Thanks Ivan it works now! The errors are not shown any longer.
I start liking Platformio more and more. 🙂
Wow, I’m glad that it now works for you, Hermann. I cannot point out enough how great the support from Ivan and his team is concerning platformio. Thanks, Ivan!
I’m late to the party, but has anyone added more data to the Weather Station? I would like to add sunset, sunrise and moon status from the Astronomy section of Weatherunderground but I had trouble modifying the library.
Hello Chad,
I am not Daniel, but on the Github Rep you find a release where this information is already added.
Look here: https://github.com/squix78/esp8266-weather-station
Good luck!
Thomas
Oh nice! Thank you, not sure how I missed this.
Traduci
come posso io vedere tutte le icone associate allo id?
how can I see all the icons associated with the id?
Thanks for sharing. No major issues using PlatformIO toolchain. Making sure it is updated via PlatformIO->Update menu items is critical. I had to edit platformio.ini to remove the default attempt to do OTA updates to get uploads to work on the Adafruit Feather esp8266 and display along with a few minor edits for those boards which run at 921600 baud so quick cycle times.
Hallo Daniel, thank you for this great project. Sorry for my bad english.
I have a problem by running the code. At night is see only the icons of the sun. So no icons with a moon. Do you know this problem?
Thank you!
Running NodeMCU 1.0 V3 clone.
I am having problems with PlatformIO. Have installed Version 1.6.0, I am able to build the new weather station code. But I cannot get it to display anything. Yes, I changed Ports to D3/D4. Display address is 0x3c. I can see the serial line output, wrting it is connecting to my Wifi and all, but no OLED-display at all.
Went back to my Arduino IDE, complied the old Weather Station Demo. Works fine.
What am I missing? My old code uses #define OLED_SSD1306. Does that matter?
Hello Markus
I also got a look at PlatformIO and have the same issue.
Build and upload seems to work fine but same as you I cannot get it to display anything.
Did you find a fix in the meantime?
Regards,
Marcos